Site Map
Current Week
Daynotes Gang
Orb Designs Test Labs
Mandrake 7.2 Installation
Once Again, with Snaps
 Email Brian Bilbrey
|
Orb Home Site Map Current Week Daynotes Gang |
Orb Designs Test Labs |
Email Brian Bilbrey
|
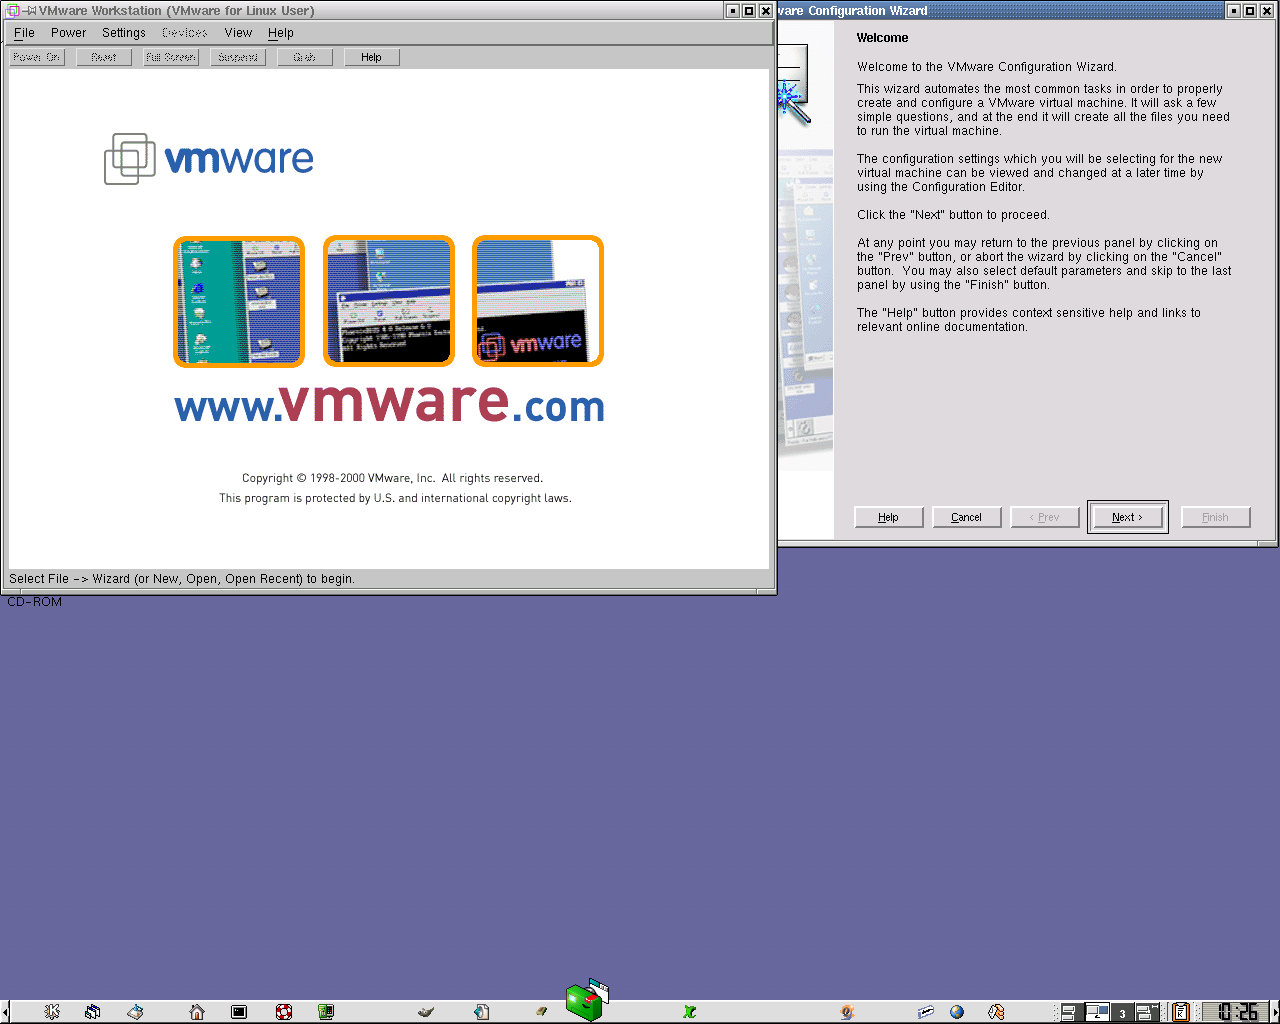
OK, here we go again, with an installation of Mandrake 7.2, this time in a VMware machine, running on... Mandrake 7.2. This way I can capture most of the screenshots that make it easier to explain what's going on at each phase of the install...
WARNING - I've done this as a public service - there are no guarantees of correctness or that this will work for you. Also, don't blow-dry your hair or use a toaster while standing in running water or a half-filled tub. Any other warnings that y'all need, you're on your own.
NOTE: I've talked about selections marked with "Stars" before... Herein, the screenshots all show little squares, either out (deselected) or indented (selected). Which type of screen is shown is dependent on the detected video hardware. Since VMware presents a plain vanilla VGA interface to the GuestOS (to start with), this is what we get. For most users on real hardware, the detected video card and monitor will provide for a higher resolution, more colors and fancier installer interface. Regardless of the merits of such, THE MAJOR DIFFERENCE BETWEEN DISTRIBUTIONS IS IN THE INSTALLER. This is how they differentiate themselves, and it will be distinct, Red Hat to Mandrake to Caldera to Debian... All the same activities happen, all the same information is entered, but the style, order and possibly the available features at install will change. It's OK. Consider it a learning opportunity.
|
|
|
|
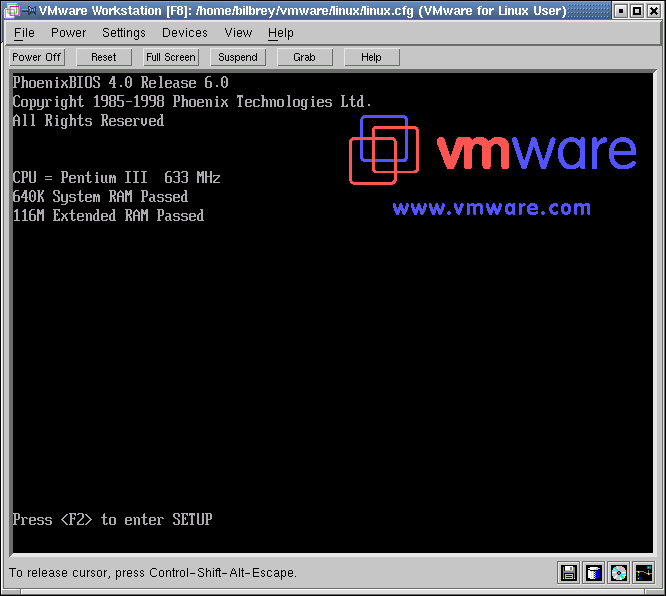
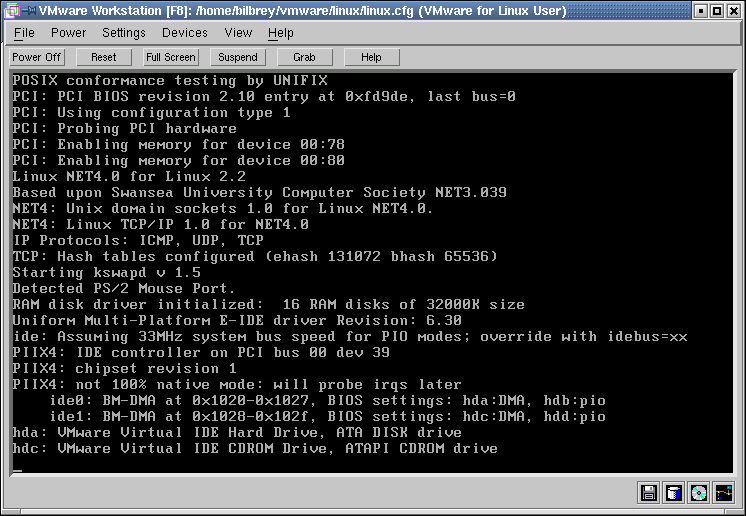
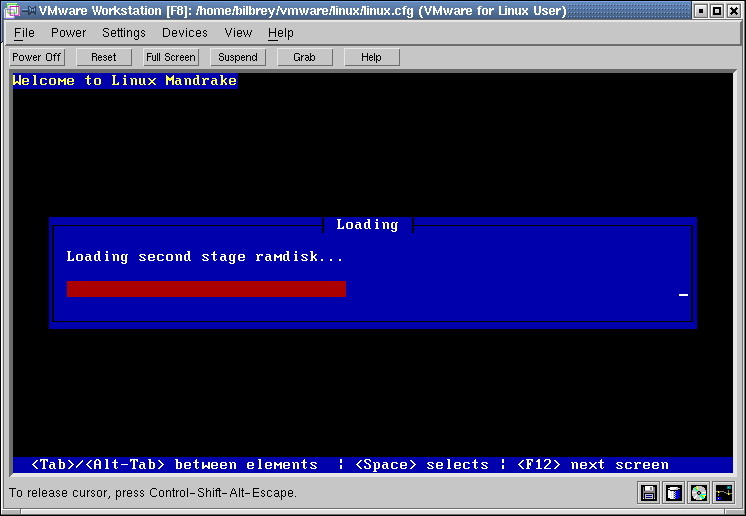
Above, I've configured VMware to use the /dev/hdd drive (a Maxtor 15G) as it's storage location. I've given the installation 128M of RAM, sound and the parallel port, plus a CDROM drive. When VMware is booting, I head into the setup routine for the custom Phoenix BIOS, and tell the system that it's boot order is CD, HD, Floppy. So screen two is POST, three is the initial Linux kernel booting from the CDROM, and then loading the second stage RAM disk. The install runs from a RAM disk, because no physical hard disk space is available until the install is complete.
|
|
|
|
Now, the installation proper is beginning...
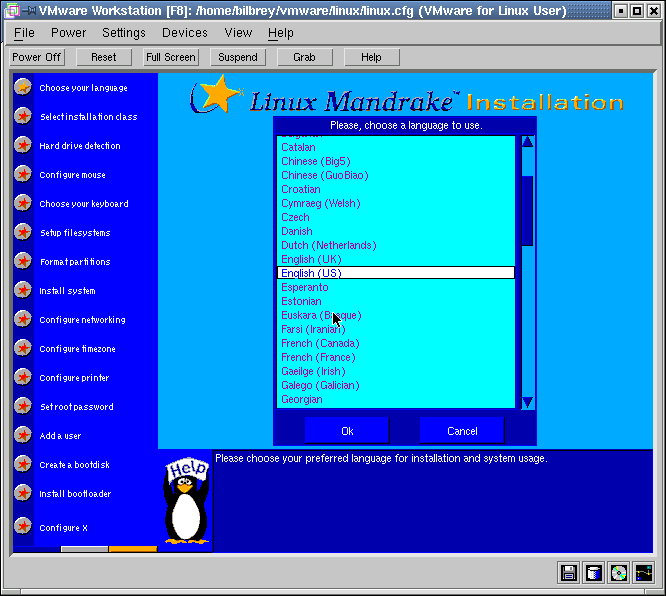
Please, choose a language to use. English (US) is the default here. If you select a different language, then all of the prompts and questions are displayed in that language. Help is not translated into all languages, however. Also, the package descriptions in the Individual Package Selection screen shown later, remain in English.
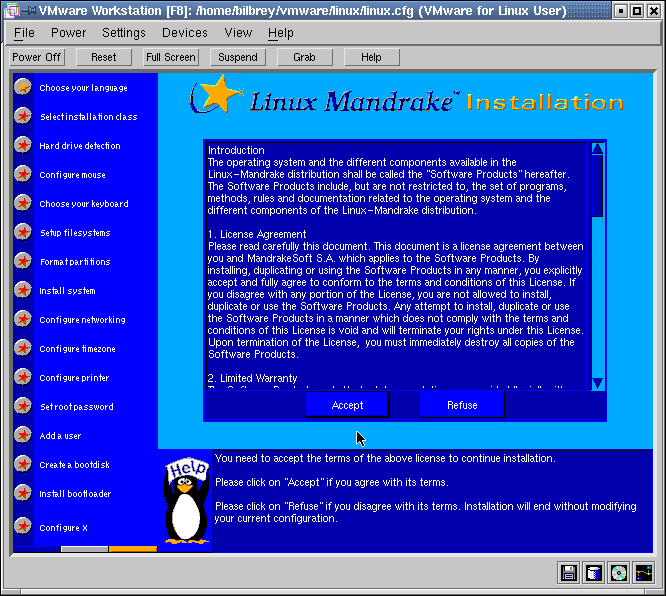
License Agreement. This "document" reminds you of MandrakeSoft's lack of liability, the product's lack of fitness for any purpose, and your (my) responsibilities under the GNU GPL, under which most of the packages that comprise this distribution are licensed. Not onerous, but clearly lawyer-influenced. Accept if you want to continue to install. Refuse to terminate the installation.
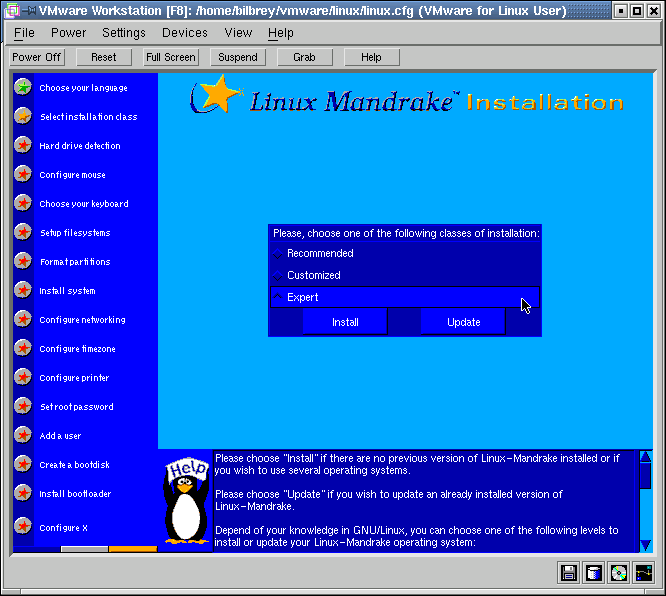
Please, choose one of the following classes of installation: Recommended, Customized or Expert Recommended leaves out some critical packages, by my lights. Customized is a halfway step to learning more about the system, Expert teaches the most. I like Expert (are you surprised???). There really aren't that many questions that are tough, and I touch on all of them here, so go for it.
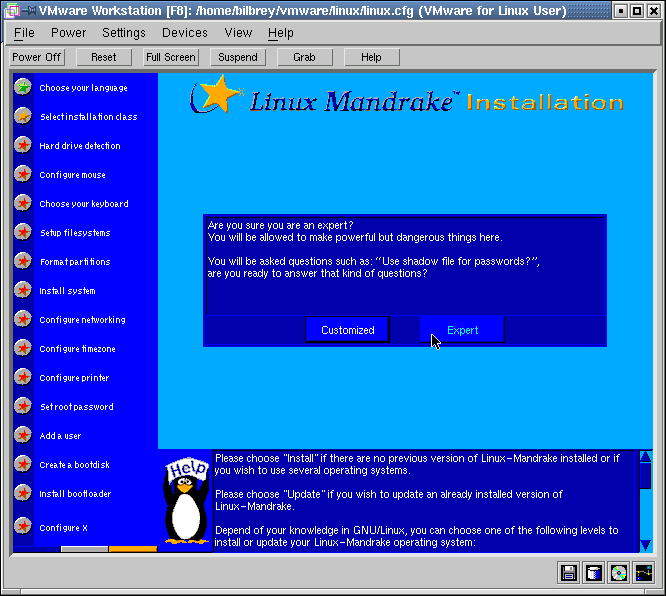
Are you sure you are an expert? This is a second chance to back down from Expert installation class. You needn't do so. Where questions are asked, if you don't understand the answers, the default selections are sane and acceptable. Don't change away from defaults without understanding, at least a little bit, but yes, Virginia, you too can be an expert. Choose Expert.

|
|

|

|
What is your system used for? Workstation, Server, or Development As you progress through the installation, make use of the help pane, at the bottom of each screen. If you're a Linux developer, then you don't need my help. If you're running a Server, then that's the choice for you. Workstation is what I pick.
From the installation help:
Workstation: this is the ideal choice if you intend to use your machine primarily for everyday use, at office or at home.
Development: if you intend to use your machine primarily for software development, it is the good choice. You will then have a complete collection of software installed in order to compile, debug and format source code, or create software packages.
Server: if you intend to use this machine as a server, it is the good choice. Either a file server (NFS or SMB), a print server (Unix style or Microsoft Windows style), an authentication server (NIS), a database server and so on. As such, do not expect any gimmicks (KDE, GNOME, etc.) to be installed.
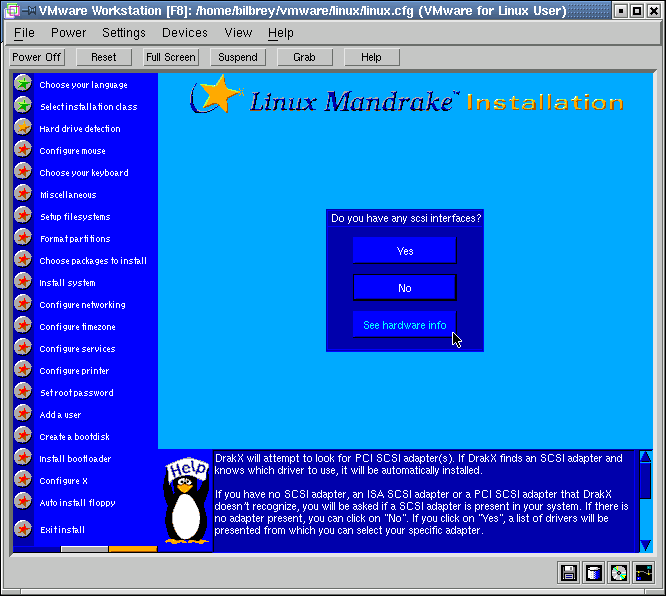
Do you have any SCSI interfaces? Well, in my case, no. There are common cards that are supported, including those from Adaptec and many Tekram models, among others (I mention those two, because I've configured systems using SCSI interfaces from those vendors). Others are not auto-detected, including most ISA models. There are drivers for most of them, but you need to choose the driver if so. Choose Yes if you have a SCSI interface that isn't detected.
Choosing the See Hardware Info button shows you all of the Auto-detected items. It's a nice way to confirm what's been found by Mandrake, prior to manually specifying anything else.
Please, choose the type of your mouse. A wide selection of mices are available, as shown in the right-hand image. Some are autodetected, others aren't. Apparently the two levels of in-direction in my current circumstances, first the Belkin OmniCube, then through the VM interface, blinds Mandrake to the Microsoft Intellimouse. I can only get the system to recognize it as a standard three button mouse.

|
|
|
Please test the mouse. In the case of many wheel mice, when the new driver is loaded, it's necessary to scroll the wheel a bit, up and down a few times, before the mouse starts responding properly. This instruction is shown down in the help pane, as appropriate. I even read it there, after a few frustrating moments. Hard for me to remember that instructions can be my friend, too.
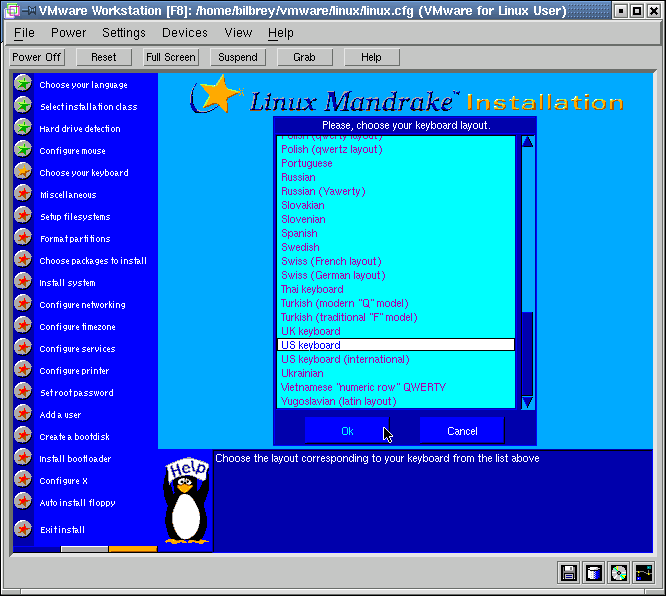
Please, choose your keyboard layout. Again, there's lots of regional variations in keyboard mappings and layouts - US keyboard is the default selection. Choose the keyboard you need, and then click OK.
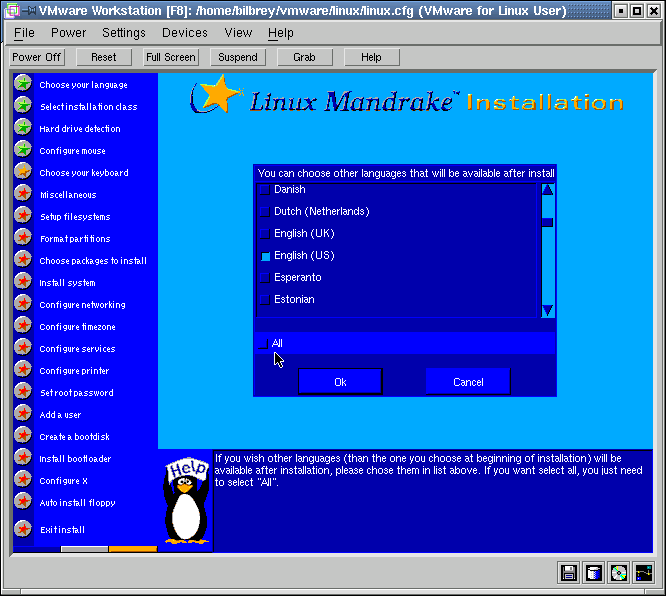
You can choose other languages that will be available after install. This selection relates to the assorted help files, man pages, and translated HOWTO documents. English is the default, with the largest number of documents. Don't select any other languages unless you need (or for some reason want) them.
|
|
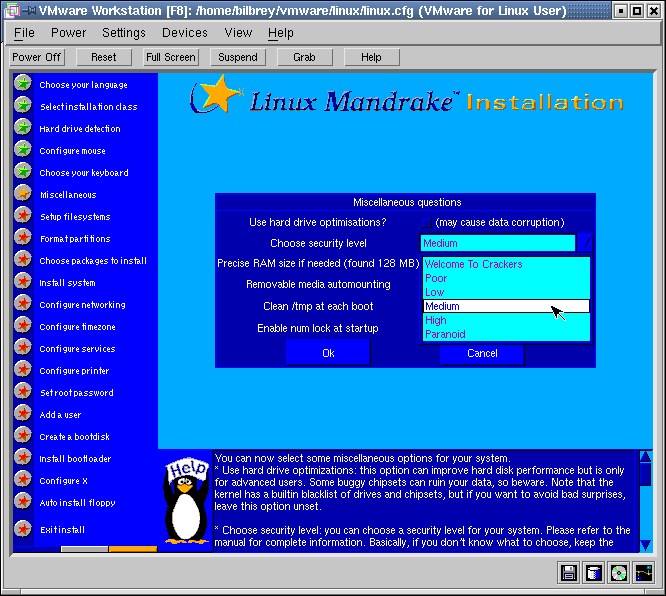
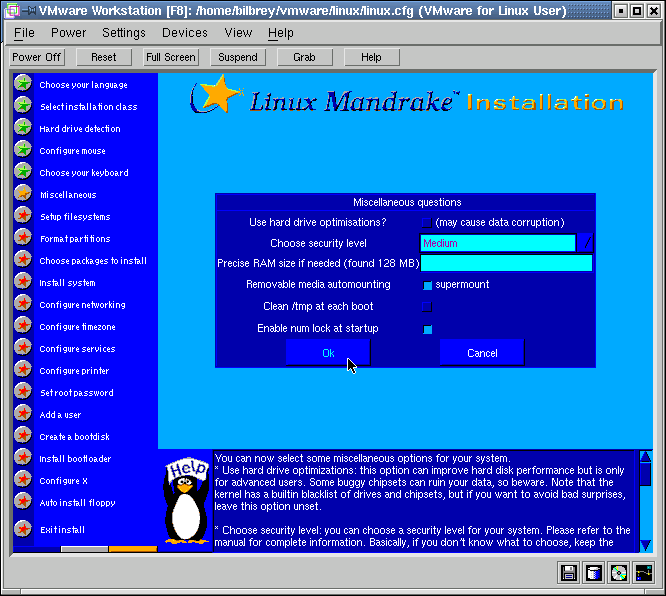
The Miscellaneous Questions dialog box is next.
|
|
|
|

|
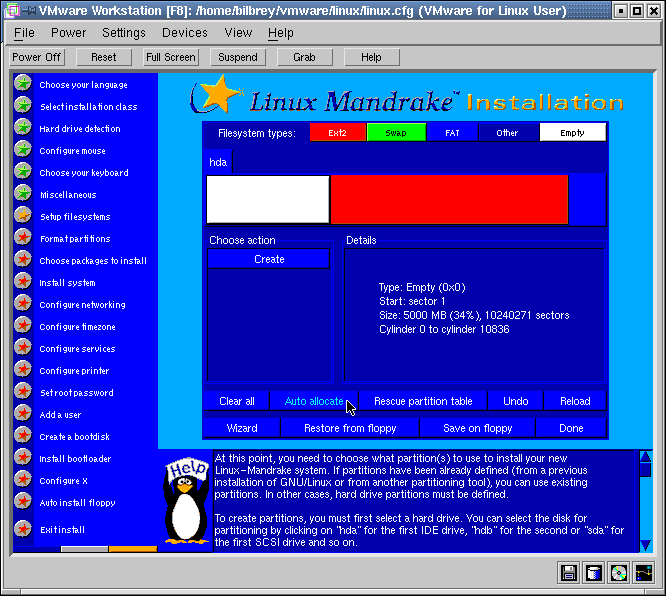
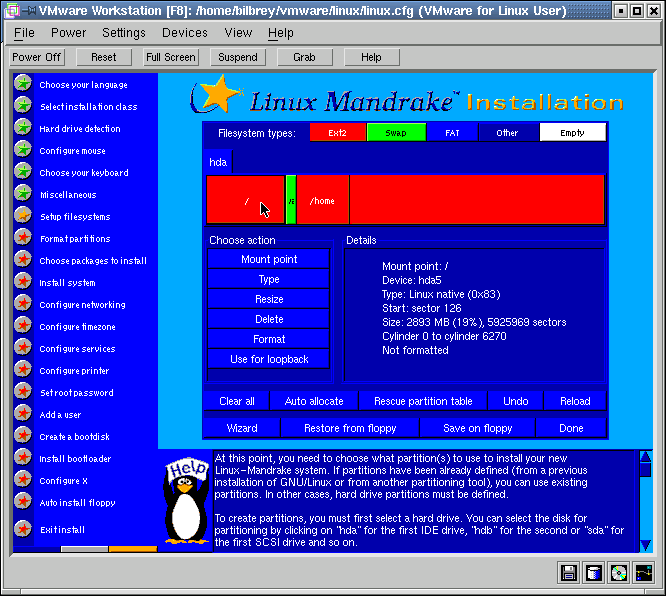
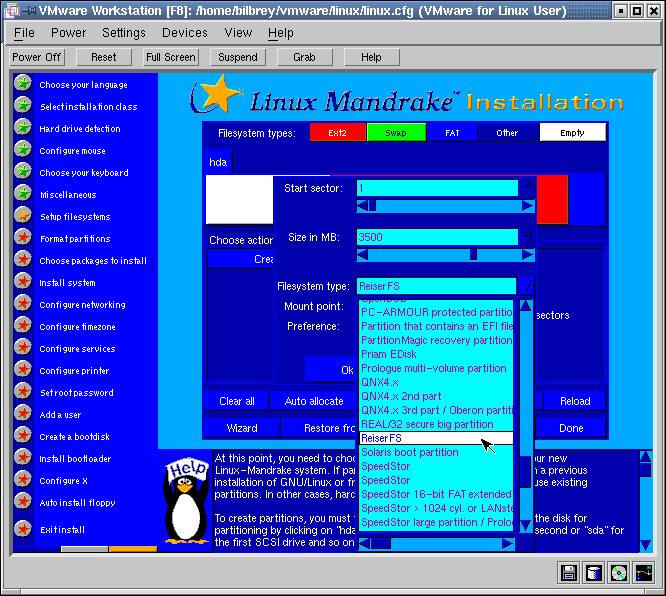
The next step is partitioning and selecting filesystem mount points. The basic DiskDrake partition manager tool is shown in the leftmost image. We're working with the front third of a 15G drive. As shown, the white space is unused on the selected drive, waiting to be partitioned.
The top of the dialog contains an abbreviated legend associating colors to filesystem types. Then each hard disk device has a tab screen associated with it. In this case, there's only the one drive, shown as hda. The following list describes the functions of DiskDrake (buttons at the bottom of the dialog):
*** NOTE: Until you select "Done", changes made are onscreen only. Modification to the actual partition table displays a warning dialog, prior to commit. ***
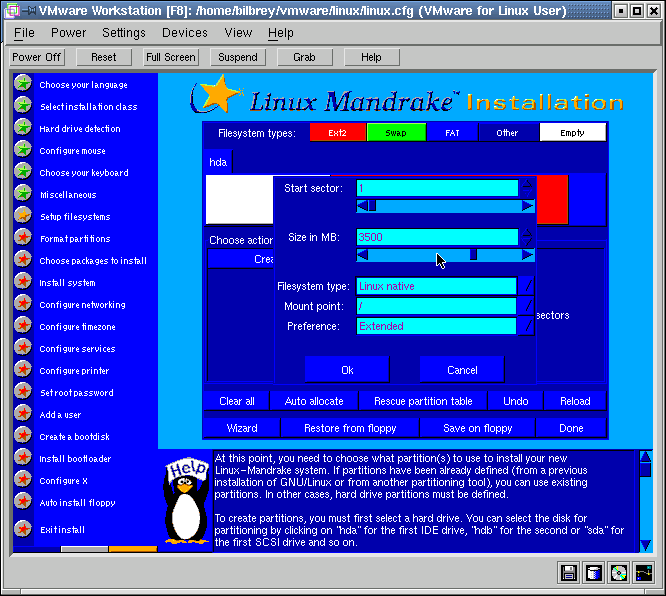
The second image shows the results of using Auto Allocate on the 5G free space. The / partition is sized to just fit the probable package load out, with not much room to spare. Swap is oversize for my taste, at 250M. So I hose those selections, and create new /, swap and home partitions. First, click in the empty space to select it, then choose the Create button (background of image 3). This opens the partition creation dialog. Start sector, size and all others have reasonable defaults upon entry into the dialog. I bump the space for / up to 3500M, since it carries /tmp, /var and /usr/local.
Image four shows a small portion of the possible Filesystem type options. I've highlighted one popular choice - ReiserFS. Reiser is a journalling filesystem which makes data more secure, and unplanned shutdown/restart cycles much faster. There's a speed penalty for the capability, and again, I don't know how it would react with VMware, so I stick with the type Linux native, aka EXT2.
The last point of interest here is the Preference between Extended and Primary. For IDE hardware, there can be only four primary partitions, one of which may contain Extended partitions. Unlike some other operating systems, Linux does not require an "active" primary partition for booting.
I make my entries and select Done, to continue with the installation.Extra Information - In normal circumstances, with a larger hard drive, here's my choices for a "good" partition/mountpoint layout, IMO. This fits in a 5G drive, but with a very small home space. (I like 6G drives or larger):
|
|
|
|
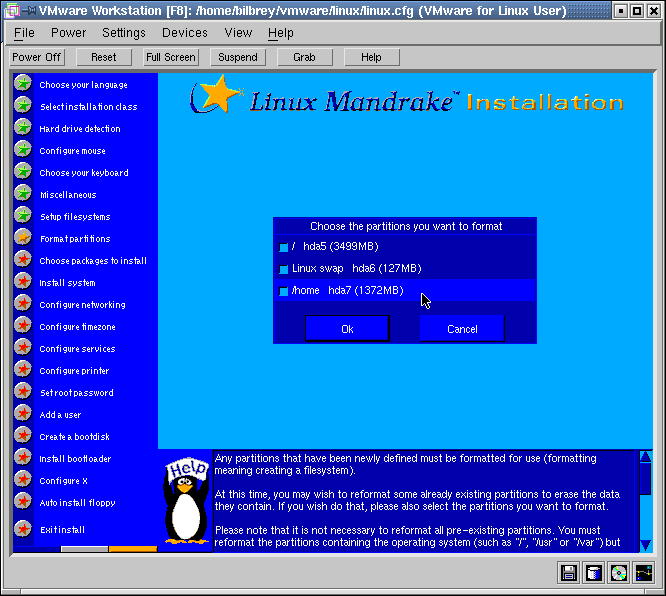
Choose the partitions you want to format. Since I neither modified nor mounted the large partition on the back of the drive, the utility only offers to format those partitions that I have freshly created. All of them are selected be default. If I had provided a mount point for a pre-existing partition, usually the partition is NOT selected by default. The exceptions to this are / and swap, both of which the installer wants to format. When I am working with my standard partition layout (shown at the end of the section above), I format all but /home and /usr/local, if I am migrating from a previous install. If there's no data to preserve, then format everything.
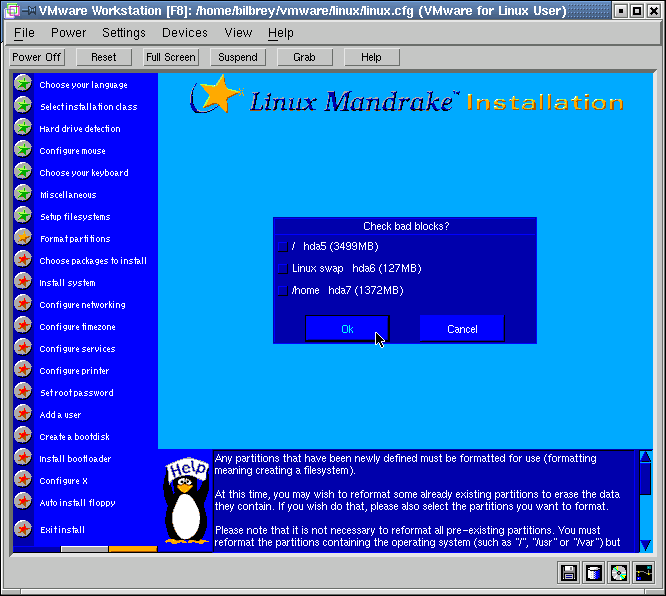
Check bad blocks? All deselected by default, I usually only do this when first bringing a new drive online. Checking for bad blocks takes a long, long time (depending on drive speed and size, anywhere from minutes to an hour or more for an 80G IDE, for instance). In this case, I check none.
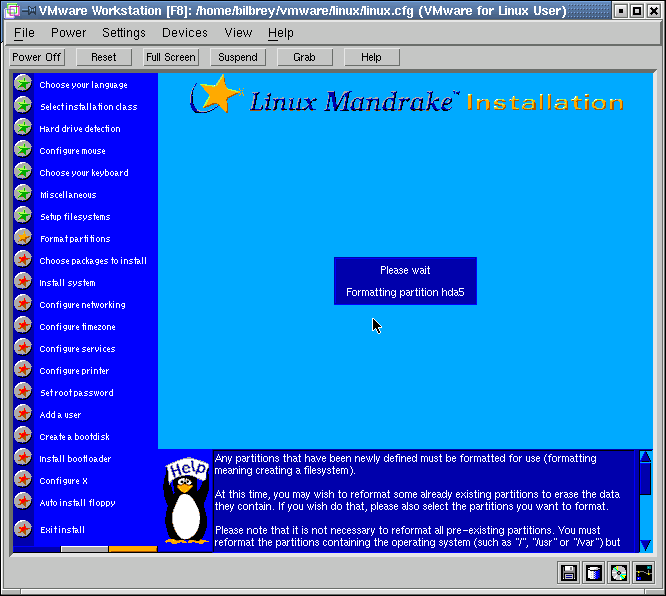
Please Wait... only two to ten minutes in most cases.
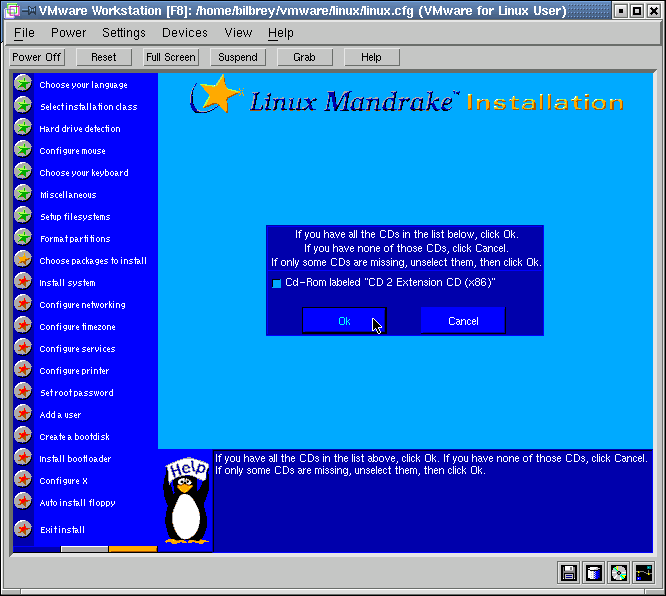
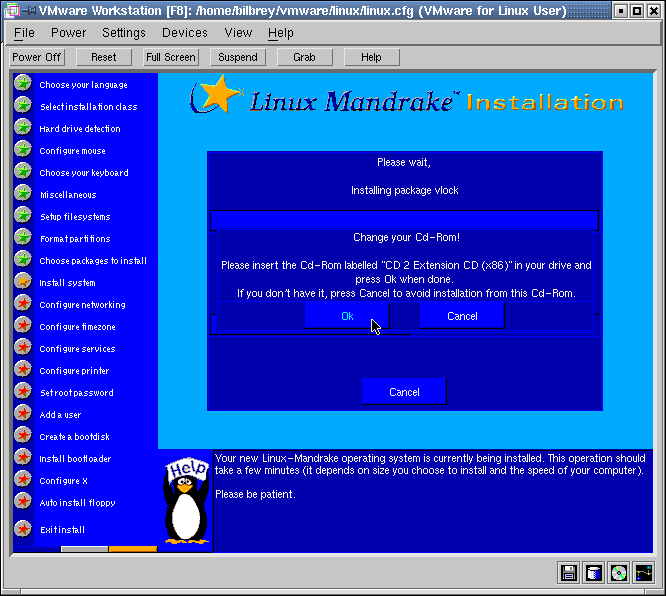
If you have all the CDs...Mandrake comes with enough optional stuff to more than fill a single CDROM. The main installation disk is a full 650M, and the "optional" disk, CD2 Extension CD (x86) is another 550M. I have both, so leave that item checked and select OK.
|
|
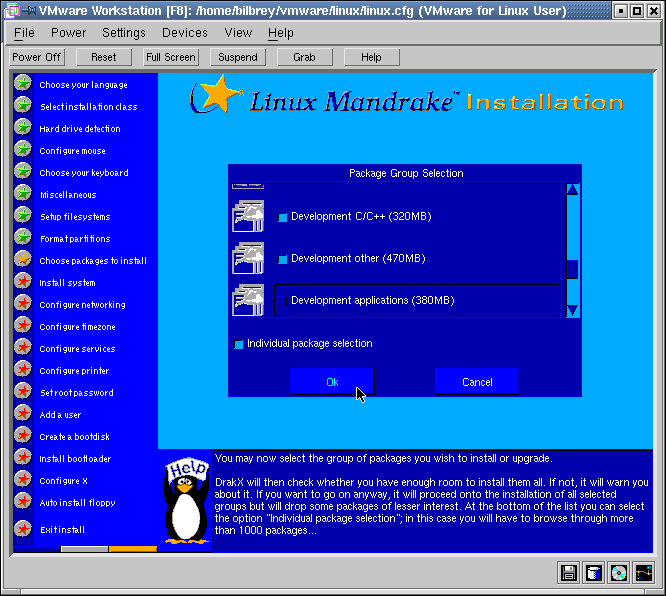
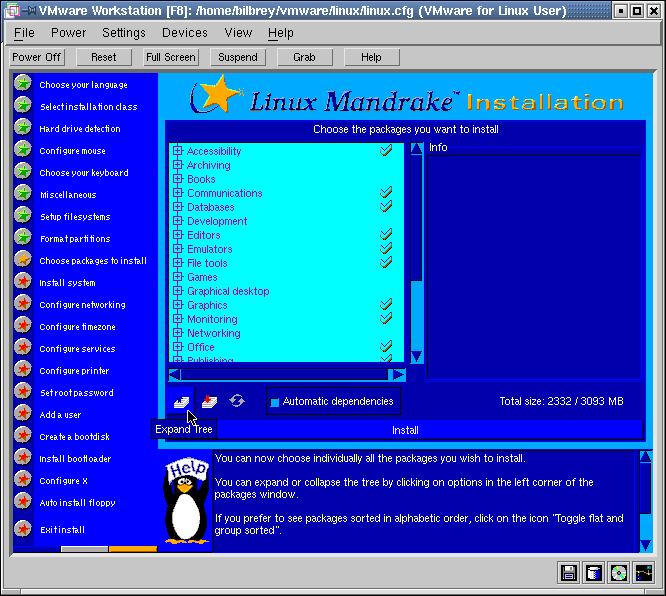
Package Group Selection is a nice feature. Stolen straight from the last version of this document, here's the list of Package groups, with "NO" next to those I de-selected. Yeah, I like a full house for Mandrake. Soonish, we'll go the other way with a minimalist Debian install. It's time. Note the check box for Individual package selection. You could unmark that if you want, but we'll leave it active, in order to get more control over the software than this large-chunk approach allows.
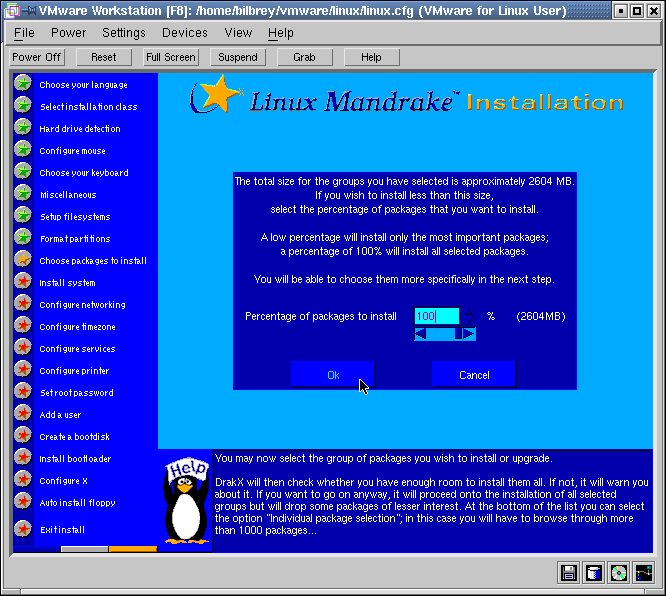
The total size for the groups... Well, anyway, the first thing we learn on this dialog is that the specified load is going to total 2.6G. Seems like a lot, for *just* an OS, doesn't it? Well, how about loading Windows 2000 Professional, Office 2000 Premium, WordPerfect Office, a bunch of games, and all the utility software you can imagine onto a WinBox. What does that total up to? Oh, and add up the features that aren't there, like Apache and other server software. Not too bad, really... However, this dialog is silly. It allows you to adjust what's loaded by PERCENTAGE??? Silly, silly, silly. But then, this distro is from the country that be-medalled Jerry Lewis. There has to be some silliness within this otherwise stellar distribution.
|
|
|
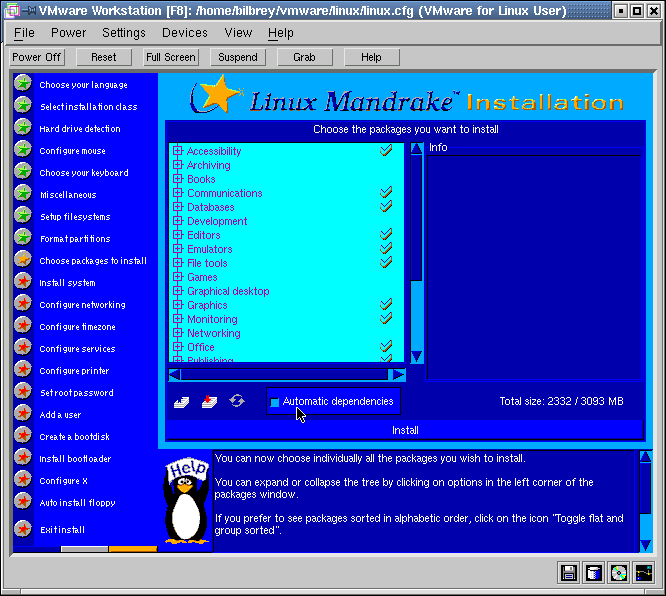
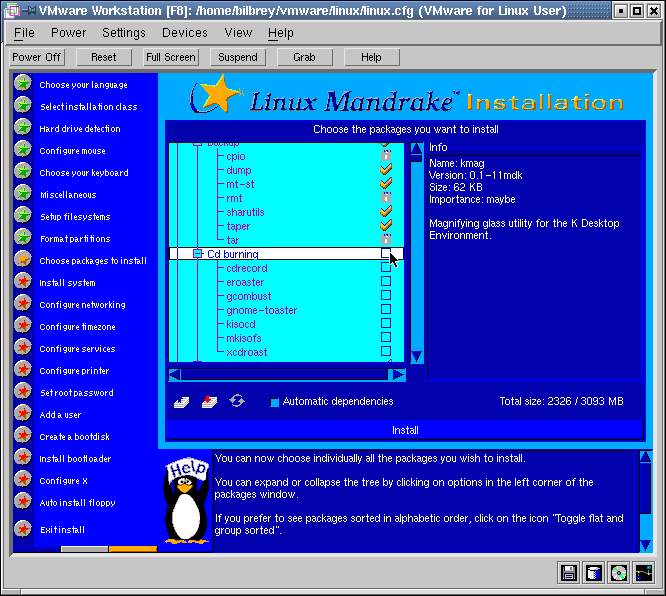
Choose the packages you want to install is one of my favorite features of Mandrake. It allows nearly Debian levels of control over the software you're installing. Also known as Individual Package Selection, there are two features to this dialog that I make instant use of.
First is Automatic dependencies. This allows me to add and subtract software with impunity - if I add something, all the other bits that are required are also added. Removing a sub-package also delists the packages that depend upon it. Then, I expand the entire listing, so that I can see what's being loaded.
In image 3, I'm actually clearing bits out. In the screenshot, I've delisted all of CD burning, since the VM doesn't pass that capability through to the Guest OS. If I were to re-select cdrecord, then mkisofs would also be added back, as a dependency. There are three different types of marker per package. The check mark indicates that the package is slated for installation. The slightly padlock-shaped symbol means that the package is required, and will be installed, it cannot be de-selected. An empty box is a software package that isn't currently set for installation.
In this dialog box, you can click on the icon to change it's status, or on just the package name to get a description of the function of the package. Note that, in these terms, a package is an RPM file, which often contains executables, configuration files, documentation, man pages, pre- and post-installation scripts and much more. For instance, to load all of the most recent KDE 2.1 Beta requires 31 RPM files, ranging in size from 9K to 9.6M. Together they provide all the functionality of the KDE desktop environment, the underlying QT 2.2.3 GUI libraries, the K-Office suite and all of the other KDE utilties, from wrappers for su to MP3 players and more.
|
|
|
|
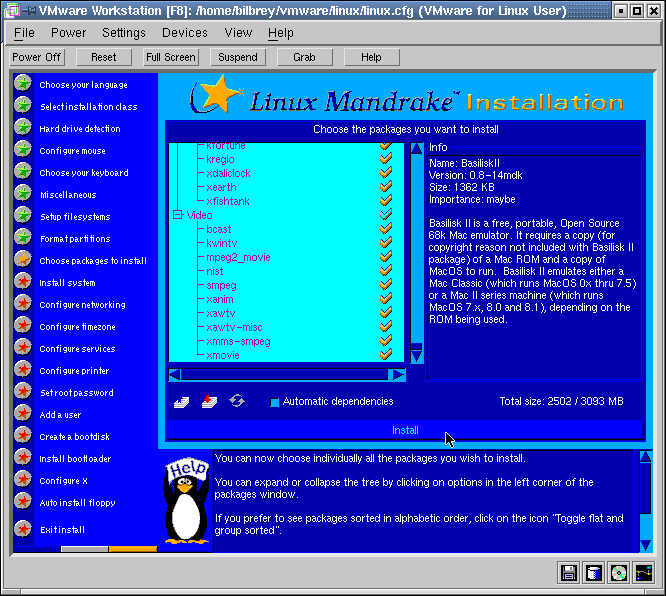
Recommendation: Don't deselect something you don't understand. It's easy to cull out the CD Burning stuff if you don't have a burner, or all of the Fax or Palm Pilot related bits, but much of this is "optional" but nice to have around. Disk space is cheap.
Once all of the packages are selected to your satisfaction (or your confusion level has increased to it's maximum), then click on the Install button, which is the width of the Individual Package Selection dialog, at the bottom.
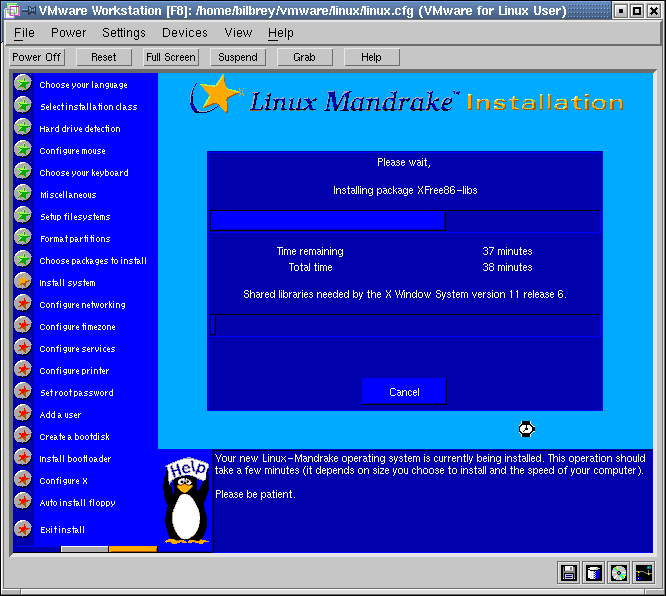
The informational dialog shown in the second figure is once again, Please wait... It's the progress-bar type of screen we've come to know and hate. Figure that the first time estimate (as shown above, about 38 minutes) is going to go up by about 30 to 50 percent, especially if you're not in the room when the first CD is ejected, and you're prompted to put in the second CD and click OK. Figure that it's about 3/5 of the total time to be spent in the first CD, alright?
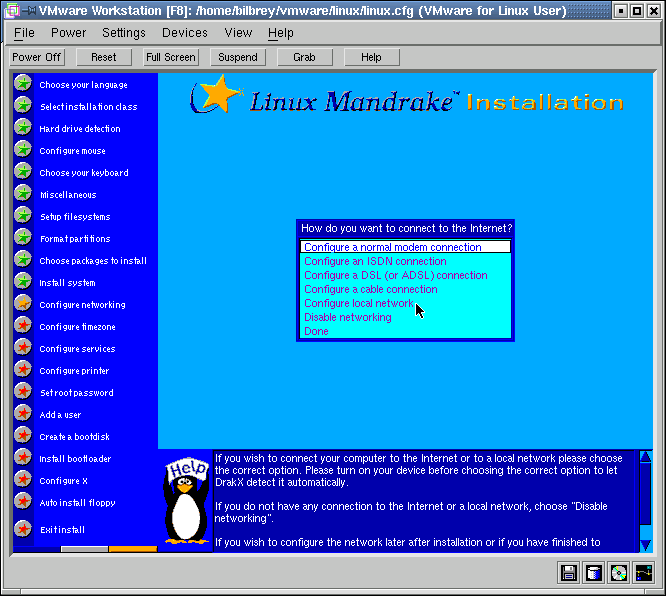
Once the software load is completed, it's networking time. How do you want to connect to the Internet? There are several choices, I'll select two, Configure local network and Configure a normal modem connection.

|

|

|
|
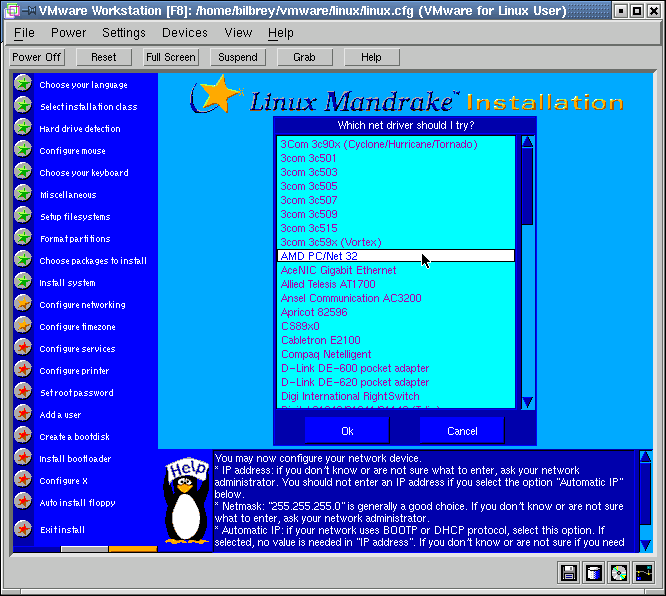
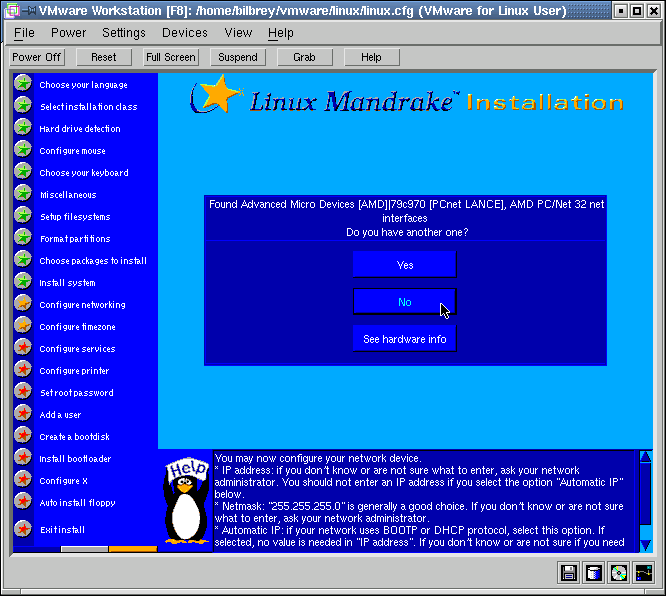
In most cases, I've found that Mandrake correctly identifies the hardware. Here, it turns out that the virtualized AMD card presented by VMware (PCnet32) is mistaken for another AMD card (Lance). I don't notice this at first, until the network card driver fails to load properly. You can see in the screen shots that in the left hand task bar, yellow stars (in progress) are next to Configure networking and Configure timezone. After the driver load failed, the installer progressed to timezone. I clicked on the star next to Configure networking to return to that step.
Then I said Yes to the "Do you have another one?" question, and selected the card type from the list, as presented in the fourth screenshot.
|
|
|
|
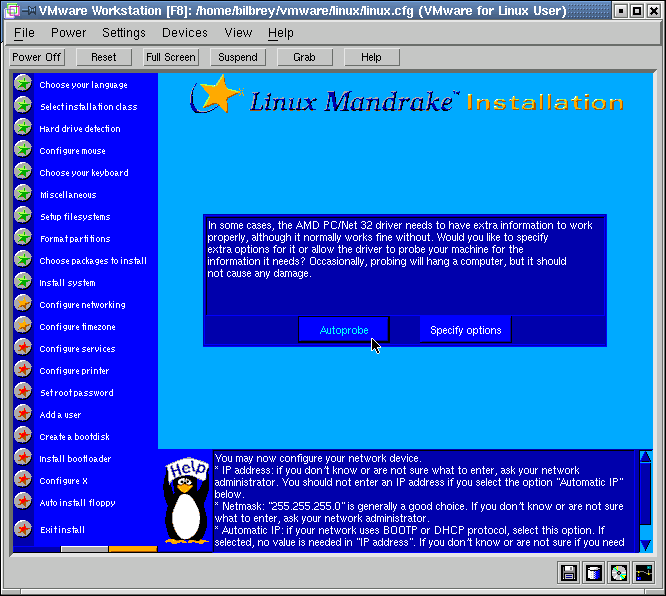
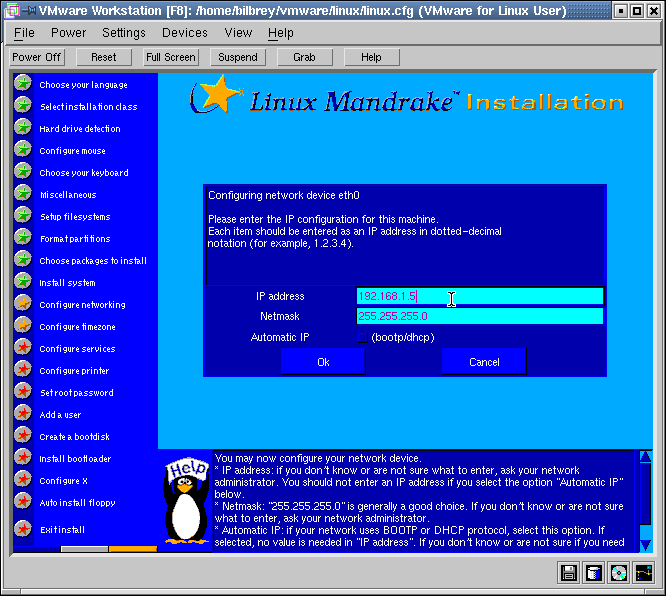
After selecting the PC/Net32 driver for the "real" AMD card that VMware presents, I chose Autoprobe to install the driver. Then we're returned to the Do you have another one? dialog. Nope, though I worry slightly about the consequences of two listed cards, one of which doesn't exist. Is this going to work, or fail? I select No (I don't have any more NICs in the system).
Configuring network device eth0 (which is unfortunately unidentified - I don't know which of the two listed cards is being configured... to reduce suspense, I'll tell you now. The Lance card remains hidden in the background, and all of this configuration taking place applies properly to the PC/Net32 card.) is our next goal. The IP address is blank to begin with, the Netmask is set to 255.255.255.0, a normal sort of value, and Automatic IP (bootp/dhcp) is de-selected. Our AWN (Apartment Wide Network) is statically configured, so I enter the address I've assigned to VMware machines, leaving the netmask and AutoIP alone. If you use DHCP in your network, select Automatic IP, and put an IP address in or not, as you choose. It'll be ignored, and data collected from the DHCP server.
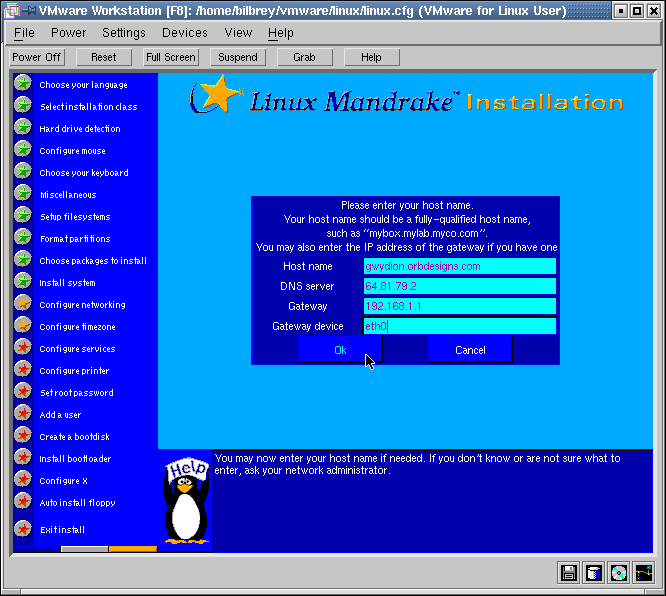
The next dialog starts, Please enter your host name. Of course, there's more to it than that, as you can see in the fourth image, but I start with my stock VMware machine name, gwydion, trailed by the orbdesigns.com domain. I add one of the DNS servers I use, the IP address of the Linksys Router as Gateway, and eth0 is the Gateway device. That last starts out blank, which seems rather dense to me, as there's no other device for it in the system, but there you are.
You must enter a value for the Gateway device, and it's usually going to be eth0 if you're on a LAN. In the case of a router or firewall box, generally things are configured to put eth0 pointing out, and other NICs pointing inward, so eth0 remains the choice. It is possible that eth0 points to an internal network, and a modem is the link to the outer world. In this case, there's more configuration to be done, but not in this document.
|
|
|
|
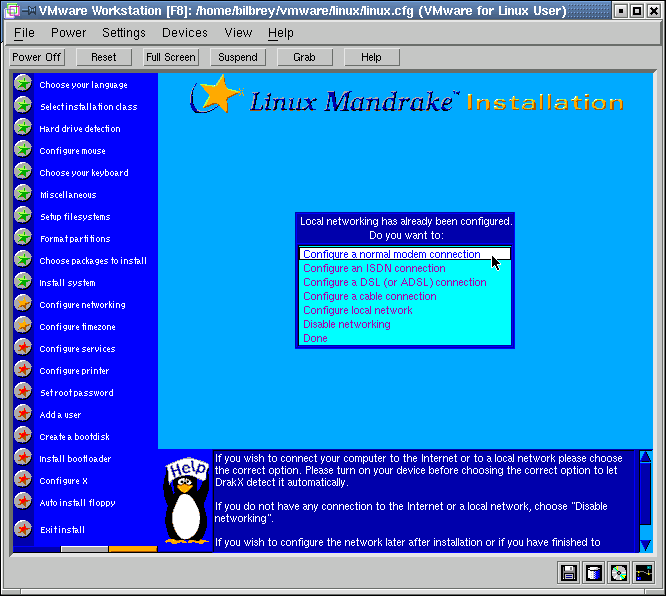
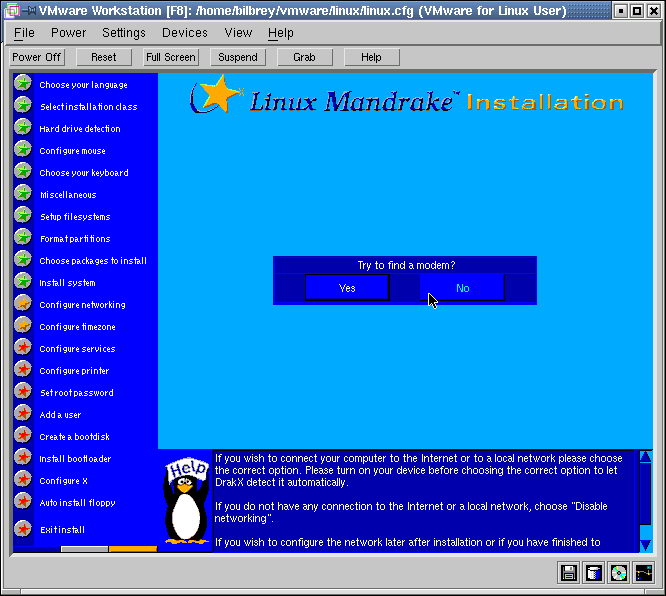
Now. although there's no modem in this system, we'll walk through initial modem configuration, at least partway. Note that the dialog box we return to reflects that LAN networking is already configured. At this point I notice an annoying inconsistency. Some dialogs like this let you select an action, then execute it by choosing OK. In this dialog, selection and action are co-existing. Feh. So I choose Configure a normal modem connection.
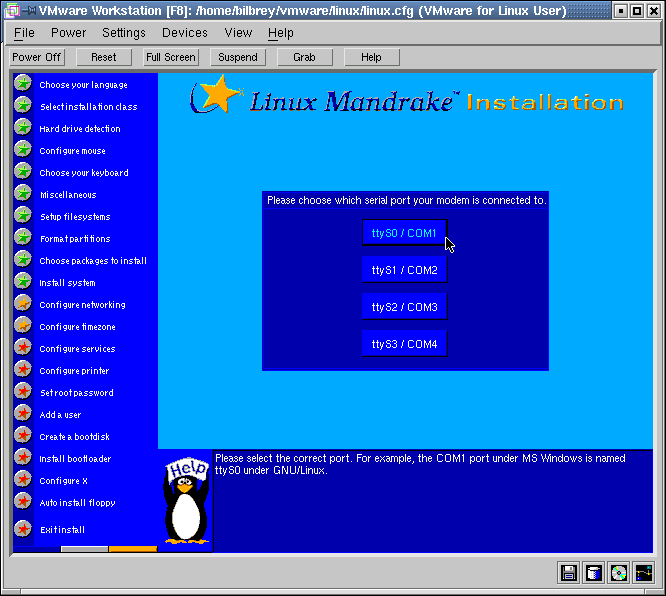
Mandrake's installer kindly offers Try to find a modem? Well, I know that'll fail, so I decline. So I manually select which serial port our imaginary modem is found on. Nicely, the installer provides both Linux/Unix device names and DOS/Win serial port names to correspond. I'll select ttyS0, for fun.
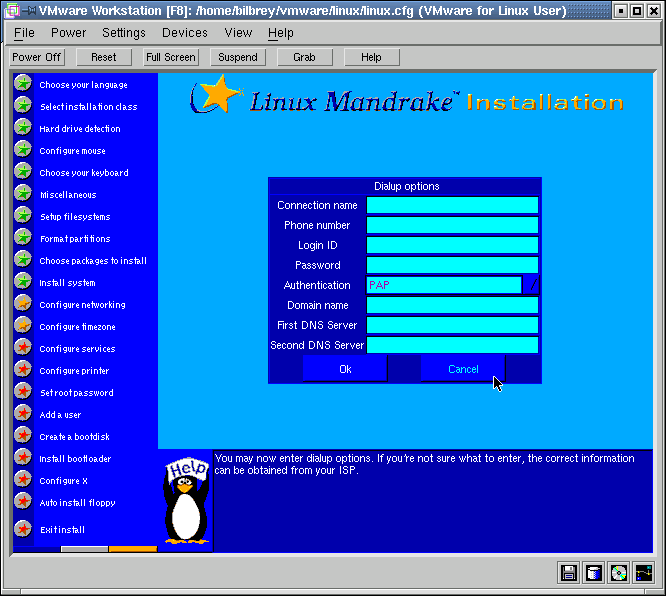
Next we're presented with the Dialup options dialog. The fields include Connection name, Phone number, Login ID, Password, Authentication, Domain Name, First DNS Server and Second DNS Server. Basically, this looks like setting up DUN under Windows. Someone will have to let me know if or how well this works, as I don't own a modem, anymore.
***TIP*** I understand from strident sources that the best kind of modem to own is external. You can watch the blinky lights, you can power-cycle the modem without having to down the computer, and there's absolutely no possibility of an external WinModem (which Linux doesn't much like).
|
|
|
|
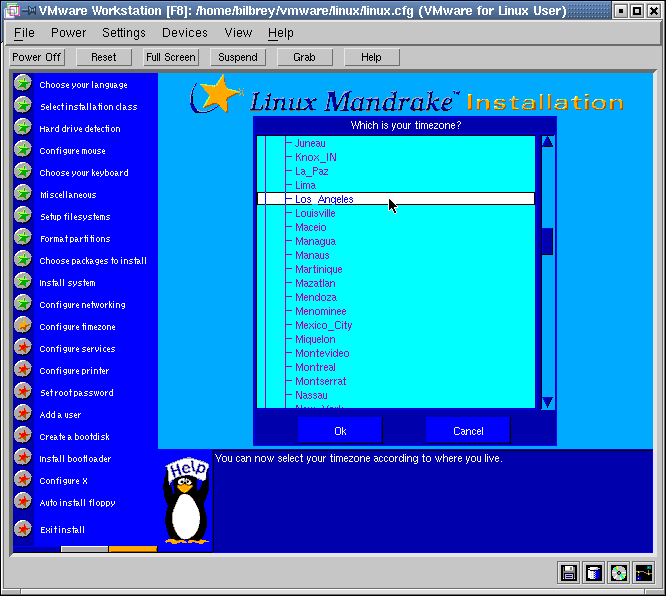
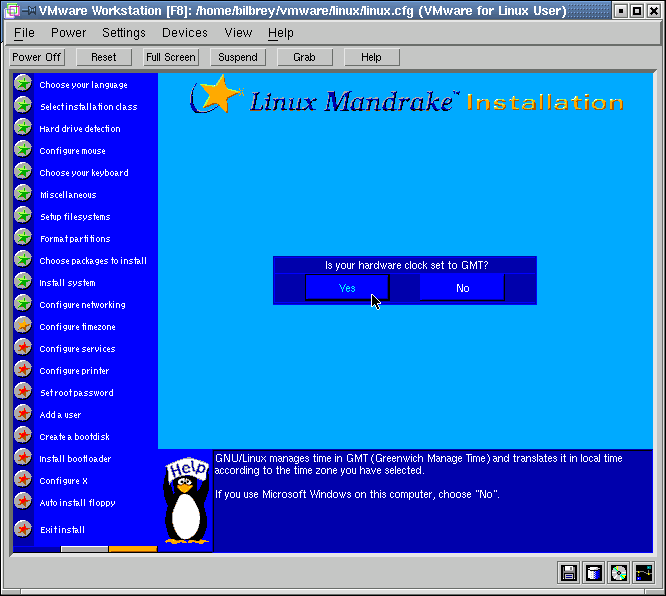
The next step, Which is your timezone? Choose by picking the major metro in your timezone. As I've agonized before, I have to select Los Angeles. Sigh. The follow-on dialog: Is your hardware clock set to GMT? GMT (aka Greenwich Mean Time, UTC, Universal Coordinated time) is the standard for most 24/7 Unix and Linux boxes. The only reason not to run with GMT is if you dual boot with Windows, which wants a RTC to reflect local time.
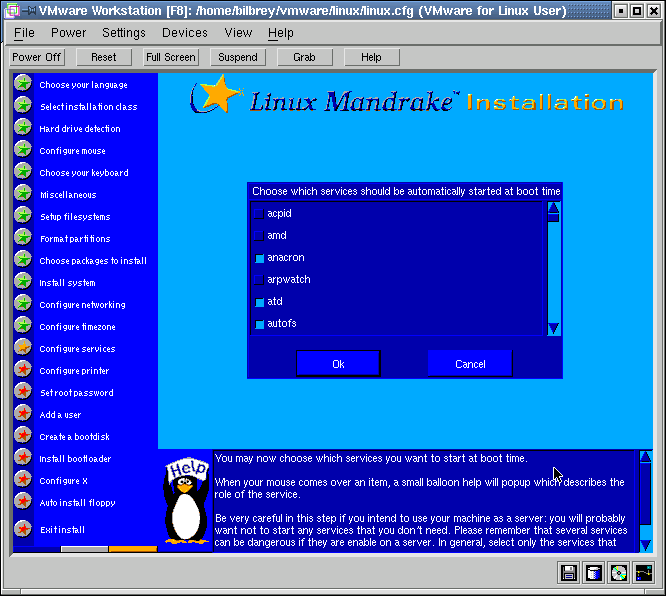
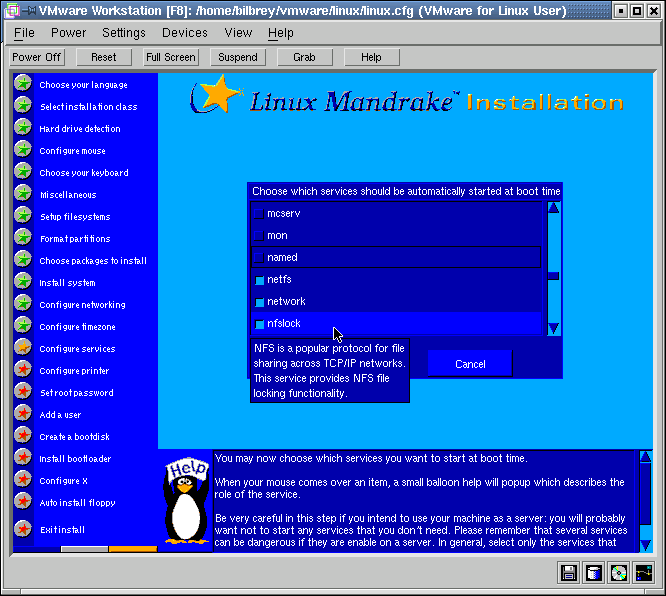
Choose which services should be automatically started at boot time. Here's the rap from the last iteration of this Install HOWTO...Tooltip like descriptions come up when you float the cursor over each selection. I'll share my choices with you (as with the listing, they're in alphabetical order, rather than functionally grouped). For each, I show what the default was. I've turned each item below on, and all others off:
I cut the services down to 15 (and I'll take SWAT down, once I've configured Samba), out of a list of more than 80. I don't have to do security updates or audits on services that don't run.Those are my keepers, to begin with. These are started at every boot.
|
|
|
|
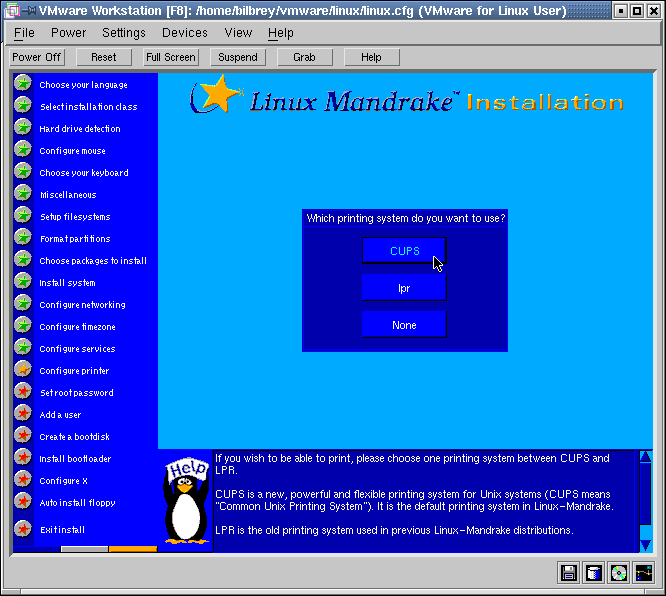
Which printing system do you want to use? Now, I thought I'd already answered that by choosing CUPS and disabling lpr in the services list, but this is for configuration purposes, rather than startup script purposes. A bit of segment to segment continuity wouldn't hurt, here. Yeah, CUPS is the one. More printers are available via CUPS than LPR.
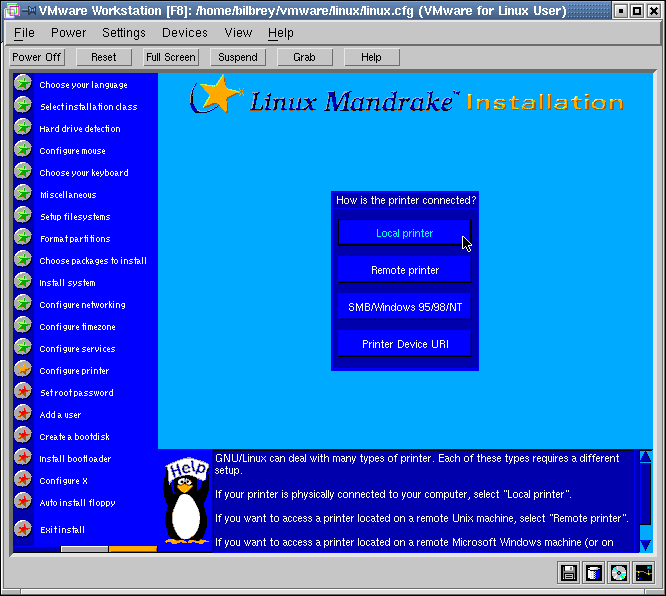
How is the printer connected? Local printer is a fairly obvious starter, but let's look at the others, shall we? Remote printer is explicitly a printer attached to a Unix box somewhere else, although printers running on JetDirect or the equivalent also are addressable in this fashion frequently.
SMB/Windows also works, sometimes. Turns out that this doesn't work well for printers that aren't supported locally - certainly there're no Linux drivers loaded on the printer's host machine, waiting for a Linux box to connect, eh? For instance, Marcia's OfficeJet 720 is a so-called WinPrinter, isn't supported well (currently) under Linux, and I've never been able to run it from Linux. Sigh.
Printer Device URI is a new (to me) method of network printing, brought in with the CUPS system. This is the bit that has horrid security holes in the shipping edition. Once Mandrake's up and running, run MandrakeUpdate and freshen that up, will you? Overall, though I haven't used this yet, it looks like it might develop into something handy, as printers can be addressed as network resources, just like ftp:// and http:// are now.
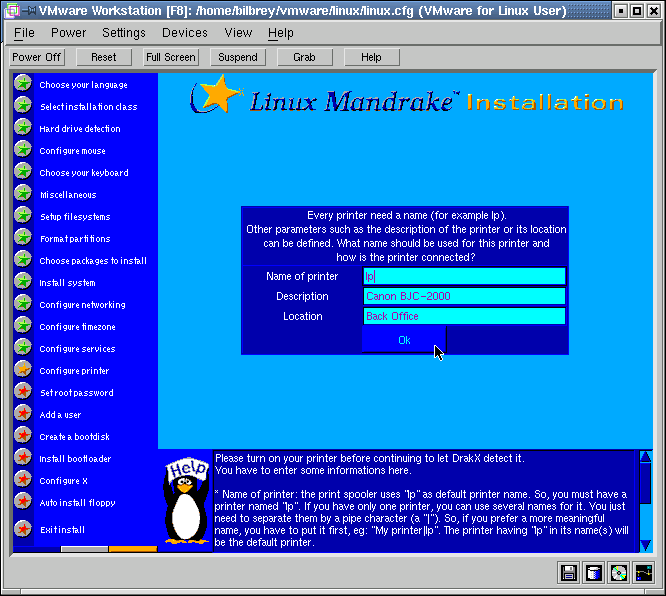
Every printer need a name. And some verbs need to be pluralized in the singular application, but we won't go there, will we? lp is the default Name of printer, and we'll leave that. Makes it much easier to connect to remotely, assuming that the printer at the other end is always lp. Description and Location are just comments, and you can put whatever you want there, but if you're sharing these over a Windows network later, good comments can be useful.
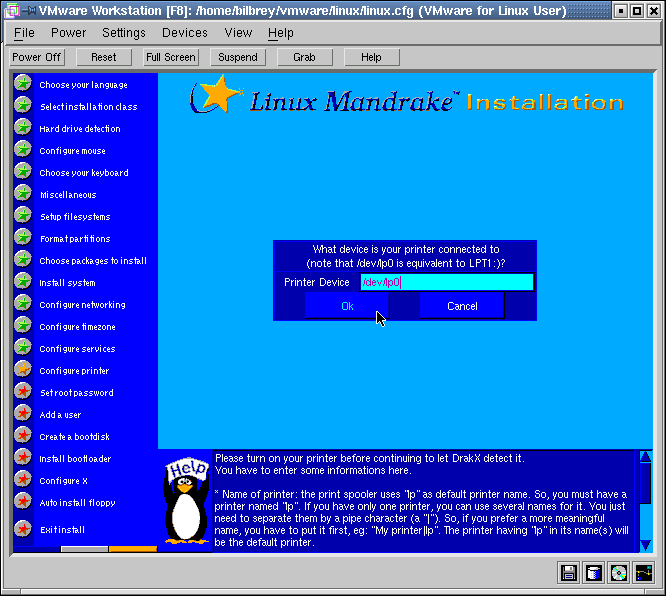
Usually, Mandrake manages to autodetect the printer at the parallel port, but because of the indirection introduced by VMware, I have to tell Mandrake about the printer. It's connected to the first parallel port, which is device name /dev/lp0 (that's a zero) in Linux parlance.
|
|
|
|
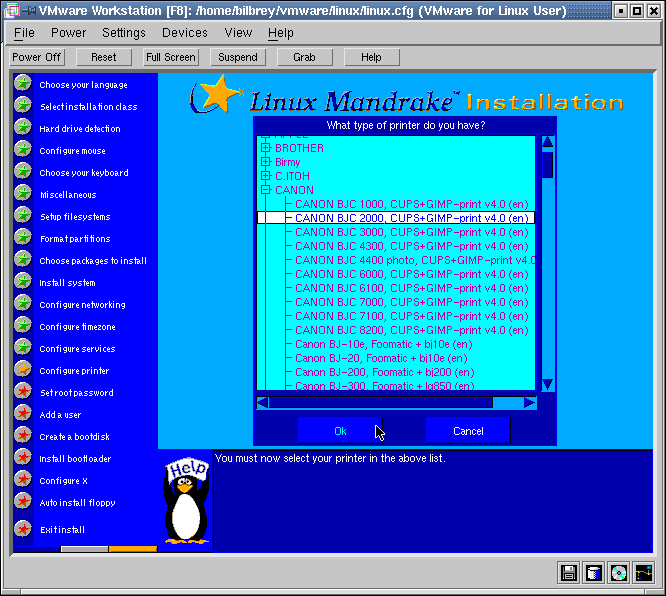
Next, What type of printer do you have? Hundreds are listed, many more than in previous versions of Linux, due to upgraded printer definition files. Choose your printer. If it isn't listed, either go to a nearby generic, or ...? Dunno, ask me and we'll see what can be done. Ask Mandrake if you bought retail and have install support.
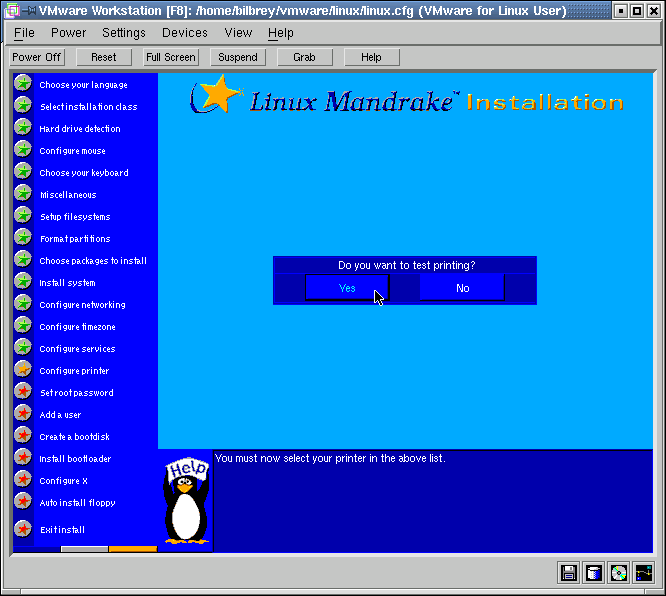
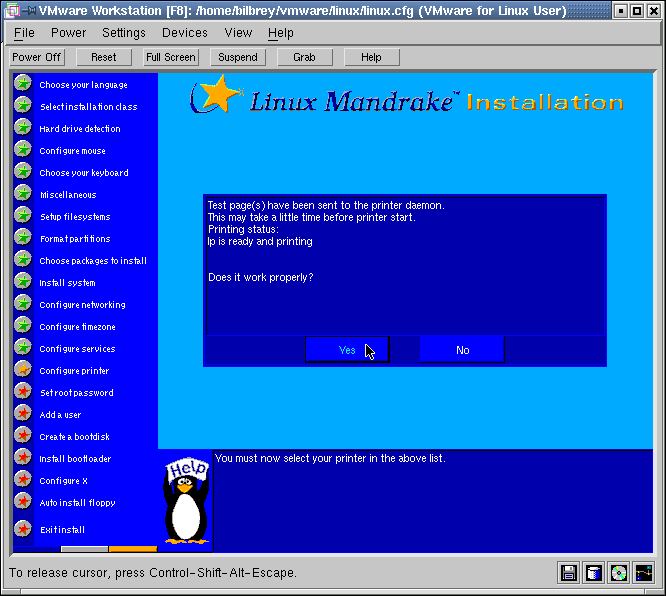
Do you want to test printing? Yep. Do so, then answer the Does it work properly? question from the next dialog. If you say No here, then it'll cycle you back to printer selection - handy when you're trying to find a close match if your printer isn't listed.
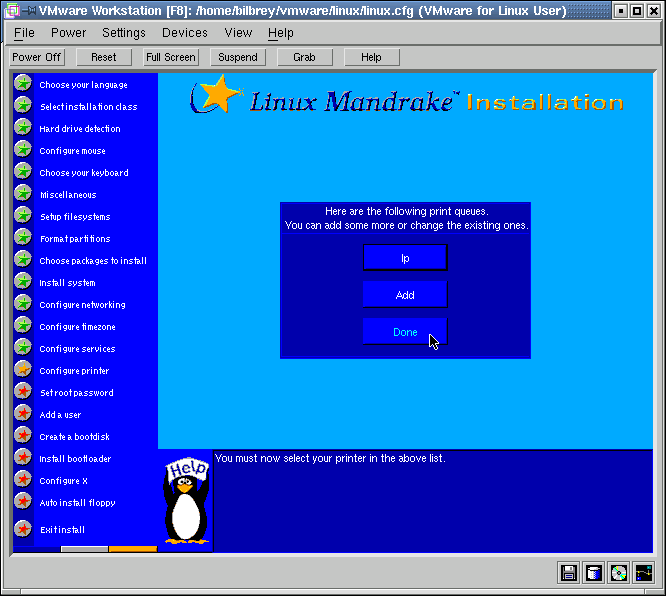
Here are the following print queues. lp is the one we've just added - you can go back and edit lp, Add a new printer, or choose Done. I'm outta here.
|
|
|
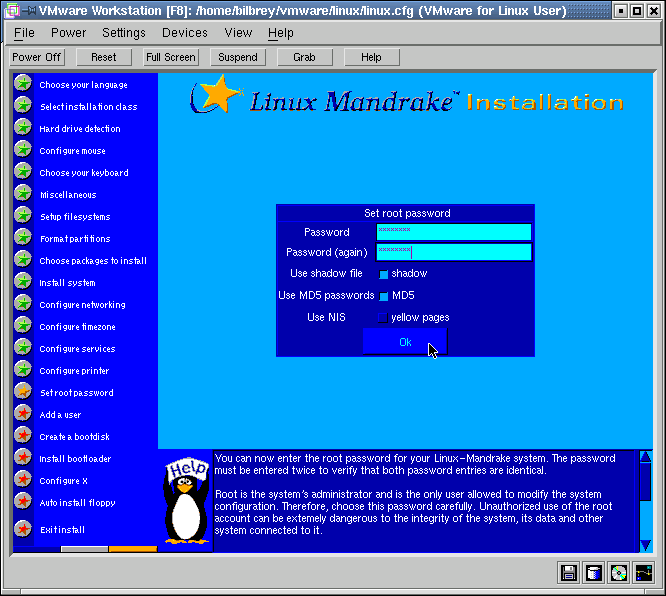
Set root password, along with a couple of important password related security questions, is the next step. A note about passwords: Do use 8 or more characters, Do use mixed upper and lower case, numeric and punctuation. Don't use dictionary words, names, birthdays or other significant numbers. Set real passwords for your systems, not the kind that you use for hotmail, POP3 mailboxes, or anything else where your password is sent across the Internet as cleartext. System passwords should always be different.
Use shadow file, and Use MD5 passwords. YES to both. These options affect how passwords are stored and encrypted on your system. A very, very good idea, these default to enabled. Use NIS. Usually, No, and default is no. NIS is a network yellow pages, resource and user authentication protocol that's fairly insecure and dated. If your network uses NIS, then you'll probably have to, but otherwise, just say no to NIS.
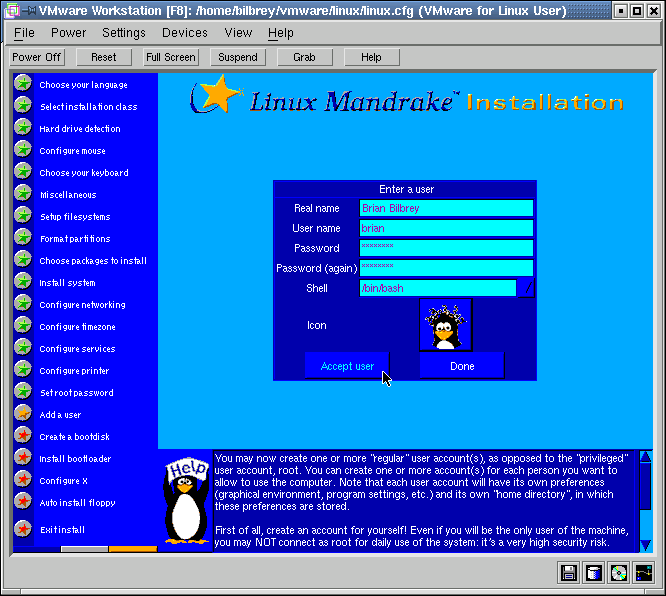
The next dialog is Enter a user. The fields are Real name, User name, Password, Password (again), Shell and Icon. Real name is a comment field, and can be anything you want. Your user name is your login, or account name. Generally, these are lowercase, and are usually limited to 8 characters. The same rules of password selection apply. The shell is the command environment you'll work in from the command line, by default. Bash is most common, and is the default selection. Unless you have a specific need for another shell, leave this at /bin/bash. Use the pulldown list arrow to see the other possibliities. Icon is a login "feature" of the Mandrake GUI login managers. Click the ICON icon repeatedly to change the picture to one which doesn't embarrass you when it appears above your username on the login screen. Then choose Accept user to complete the process.
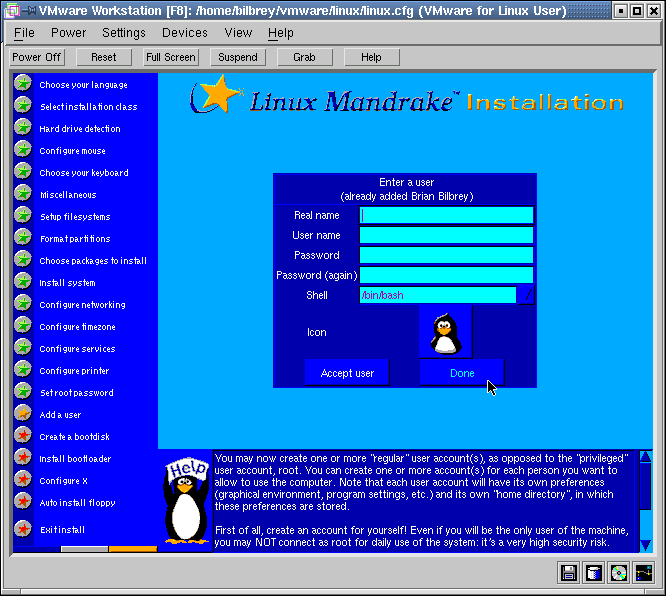
Another Enter a user dialog appears - you may keep adding system users until you're done, then select Done from an empty dialog (as shown at far right, above).
|
|
|
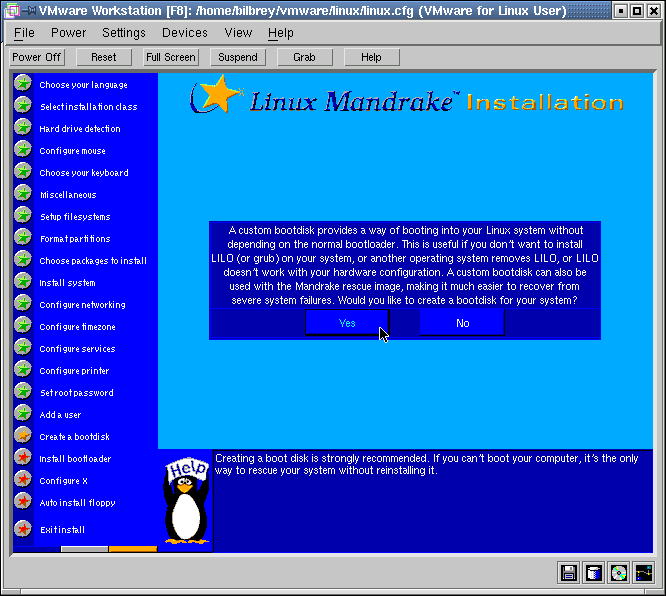
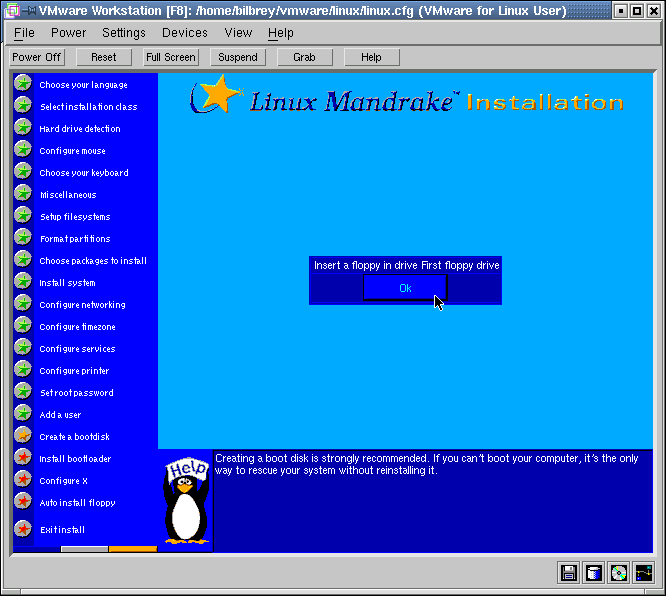
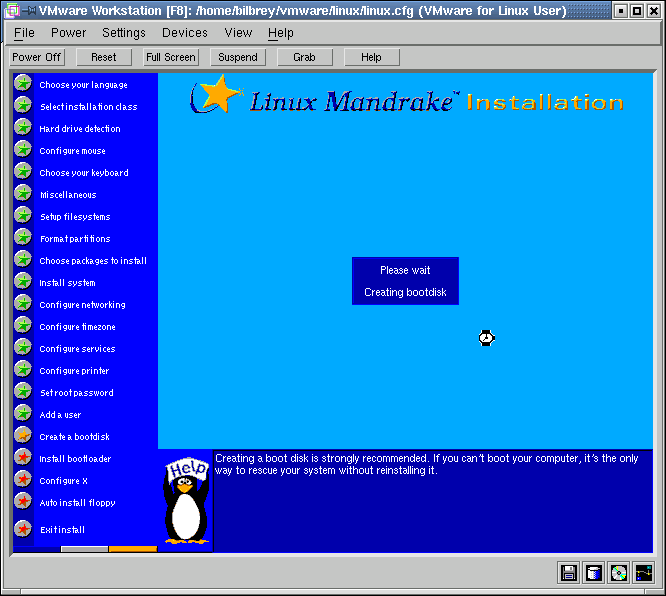
A custom bootdisk... (aka a boot floppy) is a very good idea. If you muck about with your bootloader (as I have been known to do, personally) you can render your HD unbootable. A boot floppy will make it easy to recover from such an event. All other methods are more ... fraught with danger. If you have a floppy drive, make a boot floppy. No, don't thank me, it's all right. Select YES, then Insert a floppy in drive First floppy drive, and then Please wait... A stellar collection of dialog boxes there, don't you think?
|
|
|
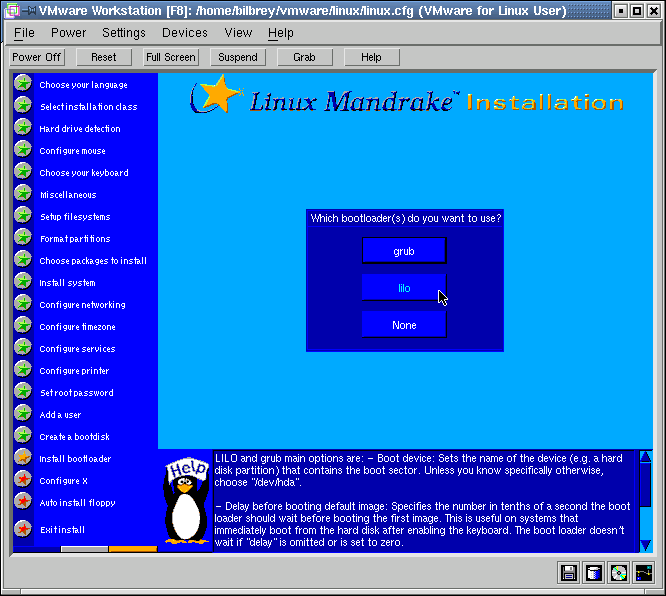
Which bootloader(s) do you want to use? An odd question, really, since so far as I know, you can only use one, but what the heck. Lilo (for Linux Loader) is the grand master of Linux bootloaders, GRUB (Grand Unified Bootloader) is the up-and-comer. Today, both GRUB and Lilo can boot from partitions beyond the 1024 cylinder limit (a legacy problem for older versions of Lilo). Both offer Text menus for boot selection, and Grub has a psuedo-GUI mode as well. The distinct advantage to GRUB is that it's a two stage bootloader, and you can edit the boot menu without re-running GRUB. Any modification to /etc/lilo.conf requires re-running Lilo. This can be regarded as a feature, rather than a bug...
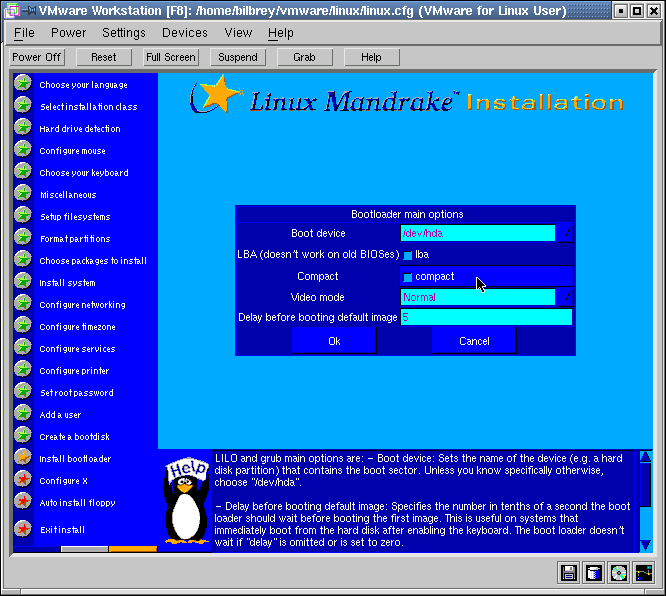
I'll stick with Lilo, thanks, and do. The next dialog is the same for both GRUB and Lilo, it's Bootloader main options. I've never had a problem with the defaults that Mandrake sets for this, with the exception of Compact. Enabling Compact allows multiple sectors to be read by the bootloader, which dramatically speeds booting, especially in the circumstance of booting from floppy (if you need to do that). It's also perceptibly faster booting from HD. Also, if the system is set up to be a dual boot, you may want to have a longer Delay before booting the default image, perhaps 10 to 30 seconds instead of 5. If your machine is from 1996 or before, then disable LBA, unless you're sure that the BIOS can handle it.
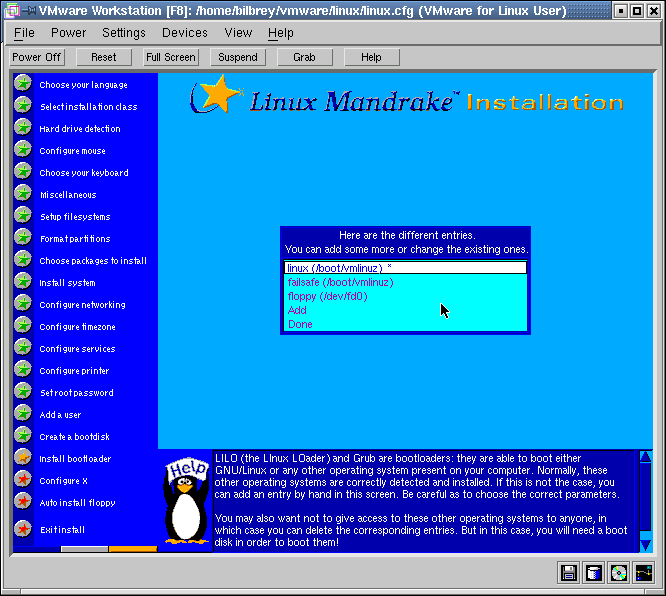
The dialog Here are the different entries lists the bootable images (systems). If you kept Windows on a partition, it'll be listed here. You can Add new entries yourself, or edit the existing entries by clicking on the name. For instance, on Gryphon, the Acer Travelmate, I delete the floppy selection, because there isn't one of them on the machine. Deletion is done by selecting the entry, then choosing to delete the entry from the following dialog box. When finished, choose Done from this screen.
|
|
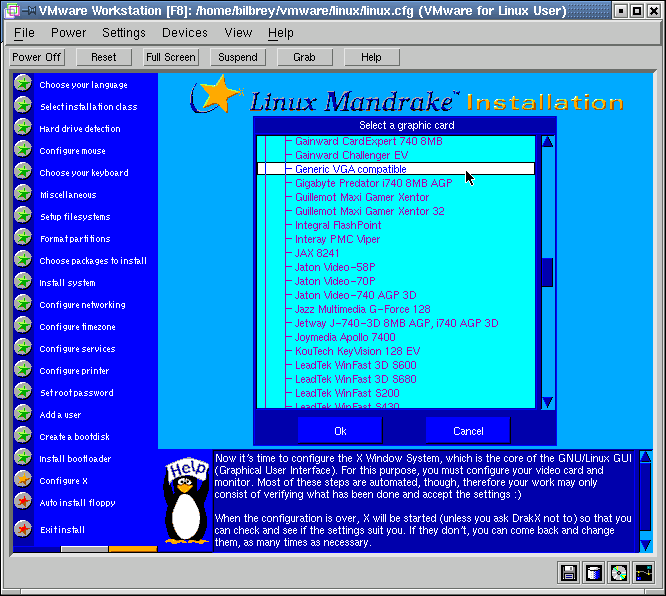
Now I've run into trouble. Mandrake simply doesn't know what to make of the virtual video setup that VMware provides. I know how to get through this, most times, but it isn't pretty, and sometimes it flops.
Which dialogs you see in the Configure X section depend on what Mandrake has detected for video hardware. This includes Graphics Cards and PnP monitors. In my case, I have to tell it to look for a Generic VGA Compatible card. Then I select OK.
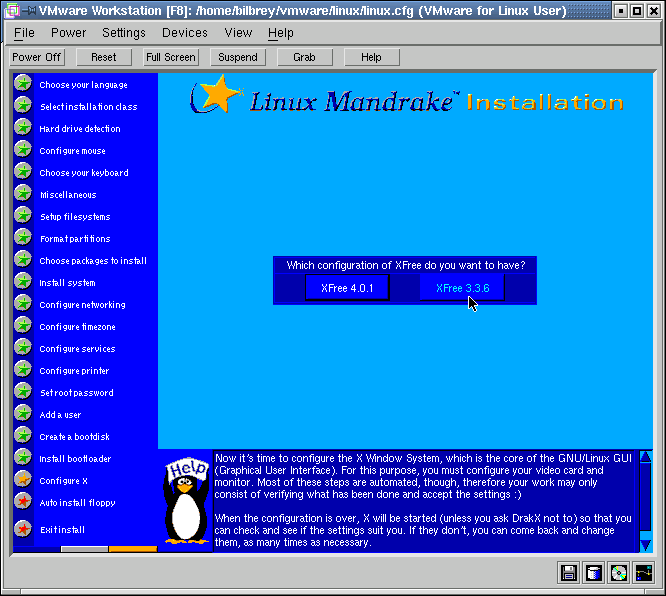
The next question is Which configuration of XFree do you want to have? On the laptop, I haven't had good luck with the more recent 4.0.1 edition, and though my main workstation's running 4.0.1, I think that I'll select 3.3.6, since I've successfully run that under VMware previously. I select that, and Kablooie. The install blows chunks all over, locks the system so hard that I have to SSH in from another box to reset the system.
That's the bad news. Here's the good news. I've never had this happen on "real" hardware. As long as your video card is OLDER than the version of XFree that you choose, generally all will be well. Other questions that I don't have screenshots of include (and these may not be the "real dialog box names" but you should be able to identify them, and correctly answer the questions.:When all of the questions are answered, the system tells you it's done, and time to reboot to start the new system. Select OK, the CD ejects, and the system reboots.

|

|
|
Fortunately, all's well that ends well. Above left, you see that in spite of saying that I was going to use Lilo, I apparently selected Grub instead. Heh. The highlighted line is the one that is going to boot, in 1 second, according to the countdown timer at the bottom of the shot. The middle screenshot is of Linux booting (all the green OKs are a good sign)
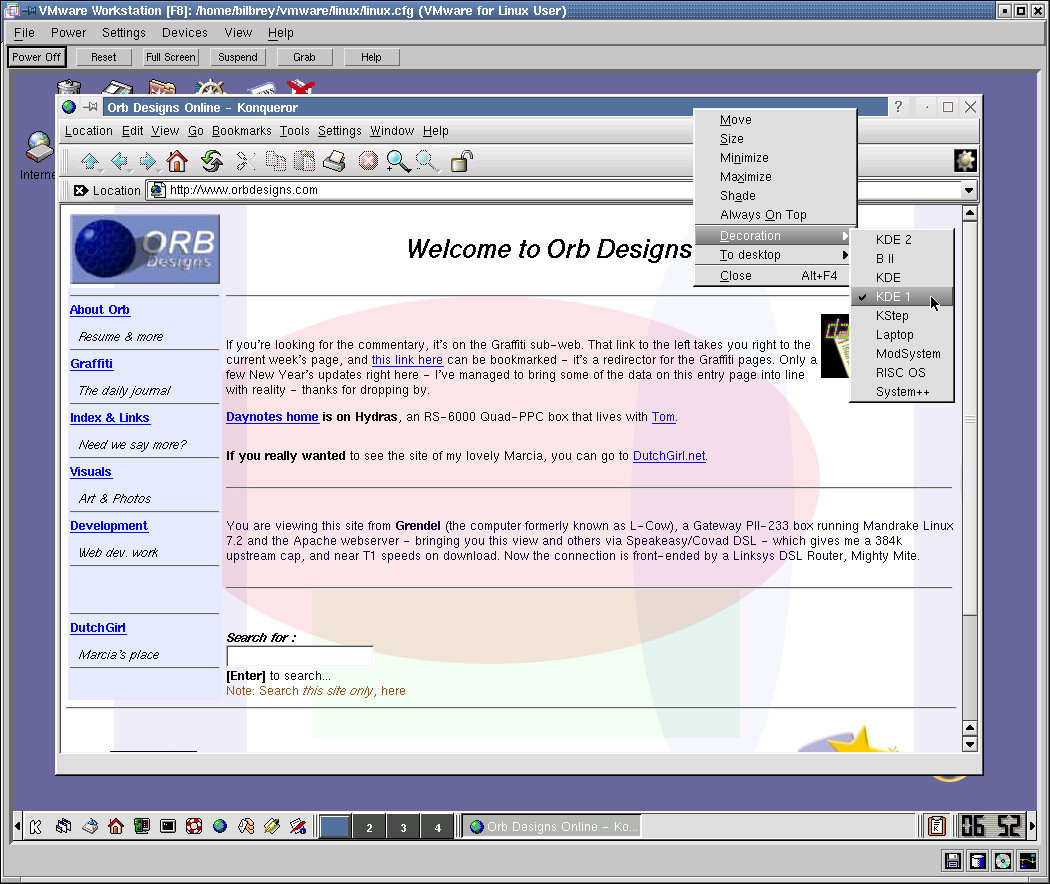
After futzing around in text mode for a while, I managed to create a working X configuration, then add in the VMware custom bits to get a functional X environment, leading the final screenshot, at left. GUI works, browsing works, stellar.
Thanks for joining me on this journey through the Mandrake installer. If you run into problems as a result of these instructions, mmmm. Sorry. Did my best to provide helpful information. If you tell me what went wrong, and where, and how to update the document to improve it for future users, I'd appreciate it.